How to Open a WooCommerce Online Store in 5 Steps
Is your website built on WordPress? Then you can use WooCommerce to create your online shop! What is WooCommerce? It is a popular free open-source e-commerce platform for WordPress websites. WooCommerce online stores are simple to install and manage. Therefore, if you are planning on launching a new e-store or moving your physical store online, here’s a quick way to do so.
Take the steps indicated in this blog post below, and you will build your WooCommerce store in no time:
Choose a hosting provider
Unlike Shopify, WooCommerce does not have an in-house hosting solution. You will need to search for a provider that offers web hosting for websites built on WordPress. As you will be accepting payments on your website, you also need to install an SSL certificate. Note that TLS versions below TLS 1.2 are no longer supported.
Create your WordPress website
First of all, go to wordpress.com and sign up with a new account. You will need to come up with a domain name for your website or use your existing one. If you create a new domain name, think about what represents your products or services best, or what problems they solve for your customers. 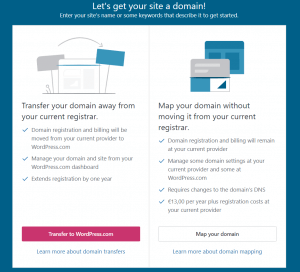
If you have already purchased a domain name, you can either transfer it to WordPress or connect it with WordPress but manage it from your current provider.
When you finally create your account, you will be logged in to your admin area. You will be able to customize and design your website as you wish.
Choose a theme and add pages
It is easy to customize your WordPress website and add titles, menus as well as widgets. You can choose from a variety of free or premium themes. Besides, you should not forget to add all the necessary pages:
- Contact page;
- Terms and conditions;
- Privacy policy;
- Refund policy;
- Delivery terms and conditions.

Install WooCommerce on your website
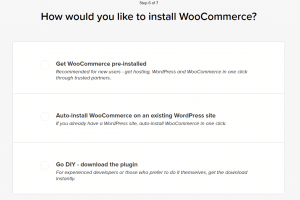
First of all, create an account on woocommerce.com. You will see three ways of installing the plugin:
- get WooCommerce preinstalled with WordPress and hosting;
- auto-install it into your existing website;
- or download the plugin and do everything manually.
The easiest way of adding WooCommerce to your website is by finding the plugin in your WordPress dashboard. Click on Tools, Plugins and then search for WooCommerce. Once you’ve selected the plugin, click on the Install button and then Activate.
WooCommerce provides different extensions to enhance the functionality of your e-store. Thus, you can select plugins for shipping, subscriptions, memberships, bookings, and, most importantly, payments.
Install the Cardinity payment gateway
There are two ways of adding the payment gateway to your WooCommerce store. You can either install it right from the plugin page in your WordPress dashboard or install it manually.
To install it from WordPress Plugin Store, follow the steps indicated below:
- Navigate to your e-shop admin area.
- Navigate to Plugins and click Add New.
- Type Cardinity Payment Gateway for WooCommerce into the search bar, select it and click on the Install button.
- If the installation was successful, click Activate. Once the plugin is activated, you can see it in the Plugins list.
- Next, you can configure the plugin. To do so, navigate to WooCommerce and click Settings.
- Click on the Checkout tab, select Cardinity Payment Gateway, then check Enable Cardinity gateway, enter Consumer key and Consumer secret you’ve received from Cardinity, and click Save.
- That’s it! Now you can start receiving credit and debit card payments in your e-store.
To install Cardinity manually, check the following steps:
- Open the WordPress Plugin Website and download the latest version of Cardinity by clicking Download.
- Sign-in into your e-shop admin.
- Then navigate to Plugins and click Add New.
- Then click on the Upload Plugin link located at the top of the page. Choose the Cardinity plugin that you’ve downloaded and click Install Now.
- If everything goes well, you’ll see Activate Plugin link on the next page. After the Cardinity payment module is successfully installed, click on the Activate Plugin link. Once the plugin is activated, you can see it in the Plugins list.
- Next, you can configure the plugin. To do so, navigate to WooCommerce and click Settings.
- Click on the Checkout tab, select Cardinity Payment Gateway, then check Enable Cardinity gateway, enter Consumer key and Consumer secret you’ve received from Cardinity, and click Save.
- That’s it! Now you can start receiving credit and debit card payments on your website.
Woohoo! All the steps are complete, and you can finally start selling in your WooCommerce online store. Don’t forget to check out more information on the WooCommerce website.
Open a merchant account for free
and start processing payments with Cardinity!